How to configure ESXi 6.5 Network Time Protocol (NTP) via Host Client?
ESXi host client is bundled with VMware Free ESXi Hypervisor. While we still have the possibility to manage single host via traditional vSphere Client (Windows based), it becomes clear that sooner or later the legacy client will be gone. That’s why this post – How to configure ESXi 6.5 Network Time Protocol (NTP) via Host Client as we’ll be using ESXi Host Client for the NTP configuration.
Let’s talk first about why it is important to configure network time protocol (NTP) on ESXi host. As you know NTP will sync the time of the host from external NTP server. Many people simply overlook the NTP configuration because they consider it as not so important. But it is.
If your host is not configured with a correct time source then you might have problems with the time sync within your VMs as those picking time sync from your host. (if not configured on per-VM basis). How? Via VMware tools periodic time synchronization which is happening during specific events, such as:
- Snapshot operation (during regular daily backups!)
- Resuming or suspend operation
- vMotion operation
- VMware Tools startup operation (startup/reboot)
Many admins also use MAC or Linux desktops/laptops so the choice of ESXi host client is their preferred method. Perhaps they simply don’t want to use a Windows machine with vSphere client installed or they don’t want to bother to set up a Windows VM through VMware Workstation/Player or Fusion.
How to configure ESXi 6.5 Network Time Protocol (NTP) via Host Client?
Simple. Connect to your ESXi host via vSphere host client (if it’s individual host. If the host is managed via vCenter, use vSphere Web client – we’ll join a screenshot too at the end of this post). The url of the connection is:
https://IP_of_ESXi/UI
Then on the left, just bellow the host, select the Manage > System > Time and Date
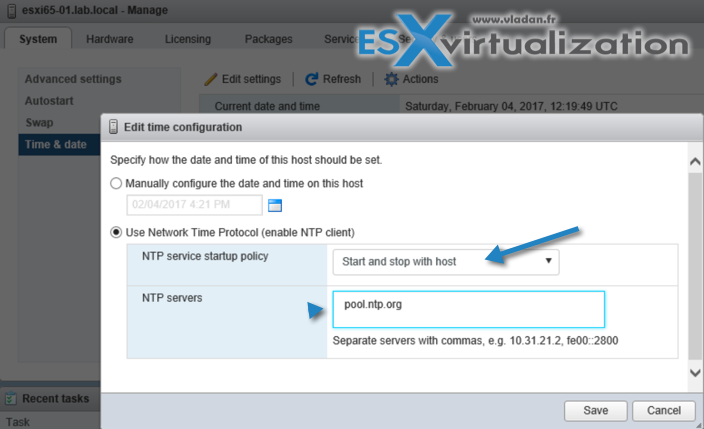
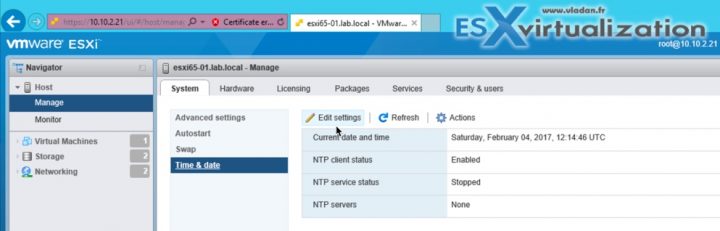 Then click the Edit Settings button to bring up the configuration window. Set the NTP service startup policy as “Start and stop with host”. Like this everytime the host will reboot, the NTP service will be started automatically.
Then enter a local or remote NTP server. For example:
Then click the Edit Settings button to bring up the configuration window. Set the NTP service startup policy as “Start and stop with host”. Like this everytime the host will reboot, the NTP service will be started automatically.
Then enter a local or remote NTP server. For example:
pool.ntp.org
Validate your settings with the Save button.
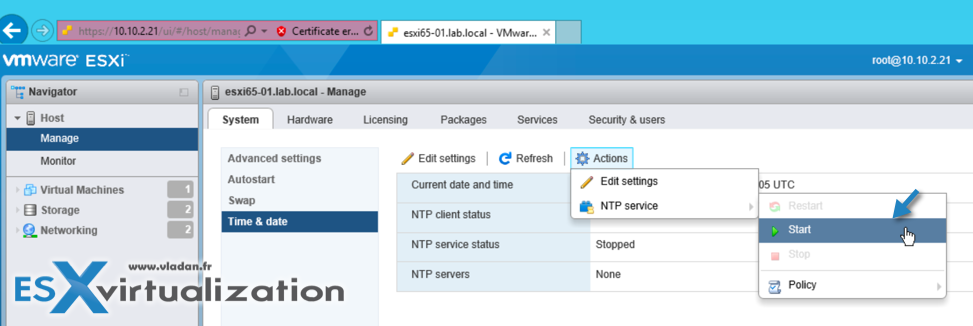
 Next you’ll have tomake sure to actually start the NTP service because configuring the policy and not starting the service is not enough. You can start the service by selecting again the Time and date > Actions > NTP service > Start
 You’re done. The host is now syncing the time with the NTP server you have entered.
Note: You’ll have to check that your host can communicate succesfully with the public server over NTP (UDP Port 123), make sure that your firewall has this port open.
What can happen if your host has incorrect time?
Few min, or even half an hour or more than an hour. Everything is possible. Well, where time sync really matters is certainly for Domain controllers. If your Domain controller is off sync, then you’ll have a certain number of problems happening within your domain infrastructure starting with long login times and then refused logins because of expired Kerberos tickets.
If you have vCenter installed and you’re managing your hosts via vSphere Web client?
You can find the settings in this location by Selecting your Host > Configure > System > Time configuration
Here is a screenshot too…
 In this post, we have seen that it is pretty simple to configure NTP on ESXi host and why it is important to do so. When you’re having larger environments with stateless hosts where those hosts are booting via vSphere Autodeploy, you can consider applying NTP configuration via host profiles for example.
Simple. Connect to your ESXi host via vSphere host client (if it’s individual host. If the host is managed via vCenter, use vSphere Web client – we’ll join a screenshot too at the end of this post). The url of the connection is:
https://IP_of_ESXi/UI
Then on the left, just bellow the host, select the Manage > System > Time and Date

Then click the Edit Settings button to bring up the configuration window. Set the NTP service startup policy as “Start and stop with host”. Like this everytime the host will reboot, the NTP service will be started automatically.
Then enter a local or remote NTP server. For example:
pool.ntp.org
Validate your settings with the Save button.
Next you’ll have tomake sure to actually start the NTP service because configuring the policy and not starting the service is not enough. You can start the service by selecting again the Time and date > Actions > NTP service > Start
You’re done. The host is now syncing the time with the NTP server you have entered.
Note: You’ll have to check that your host can communicate succesfully with the public server over NTP (UDP Port 123), make sure that your firewall has this port open.
What can happen if your host has incorrect time?
Few min, or even half an hour or more than an hour. Everything is possible. Well, where time sync really matters is certainly for Domain controllers. If your Domain controller is off sync, then you’ll have a certain number of problems happening within your domain infrastructure starting with long login times and then refused logins because of expired Kerberos tickets.
If you have vCenter installed and you’re managing your hosts via vSphere Web client?
You can find the settings in this location by Selecting your Host > Configure > System > Time configuration
Here is a screenshot too…

In this post, we have seen that it is pretty simple to configure NTP on ESXi host and why it is important to do so. When you’re having larger environments with stateless hosts where those hosts are booting via vSphere Autodeploy, you can consider applying NTP configuration via host profiles for example.
No comments:
Post a Comment