VCP6-DCV Objective 2.3 – Configure vSS and vDS Policies
VCP6-DCV Study guide continues today by covering the VCP6-DCV Objective 2.3 – Configure vSS and vDS Policies. vSphere networking is one of the tough parts to know and this part is where any IT admins have difficulties. This chapter works hand in hand with the VCP6-DCV Objective 2.1 – Configure Advanced Policies/Features and Verify Network Virtualization Implementation.
You can also check the vSphere 6 page where you'll find many how-to, videos, and tutorials about vSphere 6. Let's get back to our today's objective.
vSphere Knowledge
- Identify common vSS and vDS policies
- Describe vDS Security Polices/Settings
- Configure dvPort group blocking policies
- Configure load balancing and failover policies
- Configure VLAN/PVLAN settings
- Configure traffic shaping policies
- Enable TCP Segmentation Offload support for a virtual machine
- Enable Jumbo Frames support on appropriate components
- Determine appropriate VLAN configuration for a vSphere implementation
—————————————————————————————————–
Identify common vSS and vDS policies
Since vSphere 4 we have had vSphere distributed switches. But let's start with virtual standard switches first.
The virtual standard switches (vSS) can have following policies and settings:
- Traffic shaping (outbound only)
- VLANs (none, VLAN ID, All) – at the portgroup level config
- MTU
- Teaming and failover
- Security
If you set VLAN policy to 4095 (All) it allows you to pass All VLANs, and the tagging is done at the Guest OS level
vSphere distributed switches (vDS) policies and settings:
- Traffic filtering and marking
- MTU
- VLANs (none, VLAN ID, VLAN trunking, PVLANs)
- Monitoring (netflow)
- Security
- Traffic Shaping – inbound and outbount (ingress / egress)
- LACP
- Port mirroring
- Health check for VLAN and MTU, teaming and failover – allows to check the status of the overall config.
- And Teaming and failiover like on vSS swiches.
Describe vDS Security Polices/Settings
There are three network security policies on vDS. Those are promiscuous mode, MAC address changes and Forged transmits.
- Promiscuous Mode – Default settings are set to reject for both (VSS and VDS). If you change to accept then the guest OS can receive all traffic which passes through the vSwitch or Portgroup.
- MAC address change – The default setting is reject for VDS but accept on VSS. If set to allow then the host accepts requests to change the effective MAC address to a different one than the original.
- Forged transmits – The default settings is Reject for VDS but accept on VSS. The host do not compare source and effective MAC addresses which are transmitted from a VM.
Each settings can be set to Accept or Reject and it can be done at the virtual switch level or at the port group level. More granular ist's obviously at the port group level.
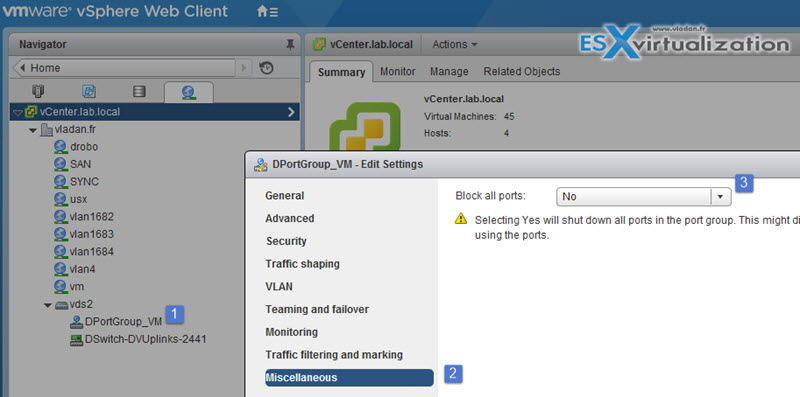
Configure dvPort group blocking policies
Ports can be blocked to prohibit them from sending or receiving data. Only available for distributed switches.
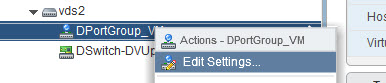
The port blocking policy is done at the portgroup level. vSphere web client > Networking > Right click a portgroup > Edit settings.
Then you get the Miscelaneous option
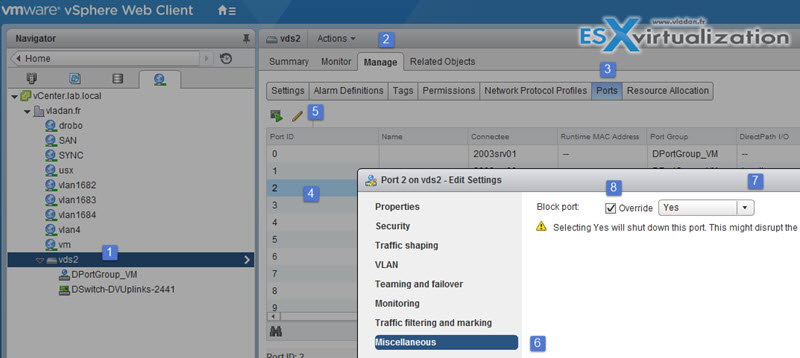
You can also block individual distributed switch or uplink port. It can be done by selecting the VDS > Manage > Ports > Select Port > Edit > check the box and select Yes.
Configure load balancing and failover policies
vSphere Networking Guide on p. 93
You can configure various load balancing algorithms on a virtual switch to determine how network traffic is
distributed between the physical NICs in a team.
- Route Based on Originating Virtual Port – The virtual switch selects uplinks based on the virtual machine port IDs on the vSphere Standard Switch or vSphere Distributed Switch.
- Route Based on Source MAC Hash – The virtual switch selects an uplink for a virtual machine based on the virtual machine MAC address. To calculate an uplink for a virtual machine, the virtual switch uses the virtual machine MAC address and the number of uplinks in the NIC team.
- Route Based on IP Hash – The virtual switch selects uplinks for virtual machines based on the source and destination IP address of each packet
- Route Based on Physical NIC Load – Route Based on Physical NIC Load is based on Route Based on Originating Virtual Port, where the virtual switch checks the actual load of the uplinks and takes steps to reduce it on overloaded uplinks.
And for VDS there is another one called Use Explicit Failover Order.
- Use Explicit Failover Order – No actual load balancing is available with this policy. The virtual switch always uses the uplink that stands first in the list of Active adapters from the failover order and that passes failover detection criteria. If no uplinks in the Active list are available, the virtual switch uses the uplinks from the Standby list.
Network Failover Detection options:
- Link Status only – check link availability. Is the adapter is physically up or down? Depending on the result it can possibly detects physical switch failures.
- Beacon Probing – Sends out and listens for beacon probes on all NICs in the team. Can be used together with link status and get better results to determine if there is a link failure. Beacon probing should not be used with IP hash load balancing policy or on vSwitches which has less than 3 uplinks. Unused NICs do not participate in beacon probing. Active/active or active/standby only.
Failover Order:
It can be specified at the vSwitch level or at the port group level, where you basically override the vSwitch level policy (VSS). If there is a failover, then standby NIC became active in order that they're specified/listed. You must define if during failback the physical adapter is returned to active state (and if it is!).
Configure VLAN/PVLAN settings
3 types of VLAN:
- None – no tags. Physical switch ports are configured as an access ports or VLAN is configured as native VLAN on trunk port
- VLAN – in this case, the VLAN ID Tag is done on the virtual switch level.
- VLAN Trunking – VLANs are tagged at the guest OS level.
- PVLAN – private VLANs
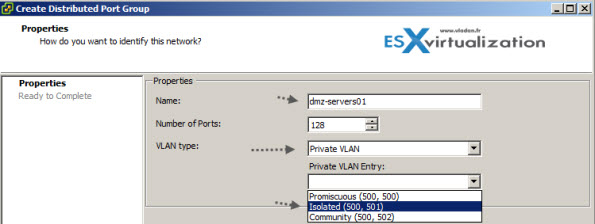
Note: Same for vSphere web client. You’ll be doing it at the vDS level, so select and right click the vDS > Edit Settings > Private VLAN tab. Once there you can add some PVLANs. Notice the Secondary Promiscuous was created automatically when you created the Primary private VLAN.
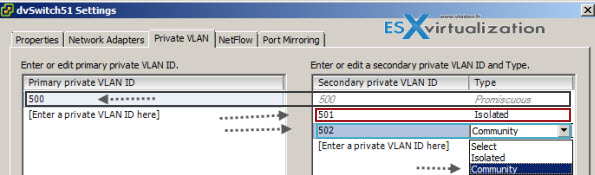
So in my example above I created Primary Private VLAN 500 which automatically created secondary PVLAN 500. Then I only could create an Isolated Secondary VLAN 501 and Community VLAN 502.
Now we have those PVLANs created and this gives us the possibility to use them for new or existing port groups. Example below I’m creating new port group with some name and after selecting the PVLAN, a new drop-down menu appears which gives the option to choose an entry between the Isolated, or Community.
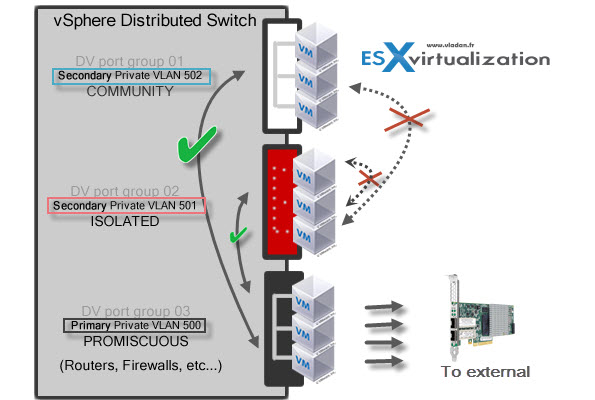
There are different types of PVLANs:
Primary
- Promiscuous Primary VLAN – Imagine this VLAN as a kind of a router. All packets from the secondary VLANS go through this VLAN. Packets which also goes downstream and so this type of VLAN is used to forward packets downstream to all Secondary VLANs.
Secondary
- Isolated (Secondary) – VMs can communicate with other devices on the Promiscuous VLAN but not with other VMs on the Isolated VLAN.
- Community (Secondary) – VMs can communicate with other VMs on Promiscuous and also w those on the same community VLAN.
The graphics shows it all…
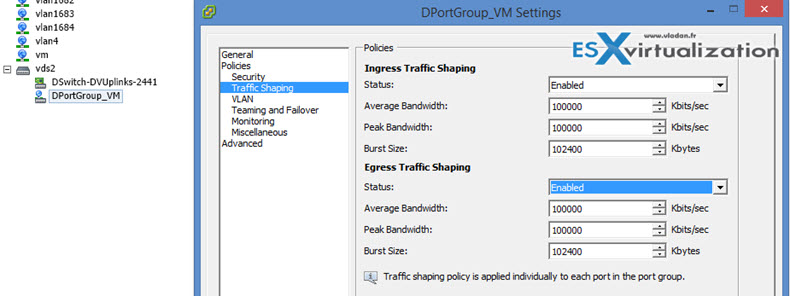
Configure traffic shaping policies
On vDS there are Ingress and Egress traffic shaping policies.
- Average bandwidth in kbits (Kb) per second – Bits per second to allow across a port, averaged over time.
- Peak bandwidth in kbits (Kb) per second – Maximum number of bits per second to allow across a port when it is sending or receiving a burst of traffic.
- Burst size in kbytes (KB) per second – Maximum number of bytes to allow in a burst.
At the port group level (both Web client or vSphere client). Home > Networking > right click the port group > traffic shaping.
Enable TCP Segmentation Offload support for a virtual machine (TSO)
TCP segmentation offload is used for reducing a CPU overhead of TCP/IP on fast networks. TSO breaks down large groups of data sent over a network into smaller segments that pass through all the network elements between the source and destination.
Only on enhanced vmxnet adapters. If you using just vmxnet you must replace the adapter by enhanced vmxnet adapter.
From VMware KB Enabling TSO in a Windows virtual machine
To use TSO, enable it in three places: the VMkernel, the virtual machine, and the guest operating system.
- TSO is enabled for the VMkernel by default. If it is disabled on your system, you can enable it in the VMware Management Interface Advanced Settings page. Access this page by clicking the Options tab.
- Enable TSO for the virtual machine by powering off the virtual machine and adding the following line to the configuration file (.vmx):ethernetn.features = “0x2”In this example, n is the number of the virtual Ethernet adapter.
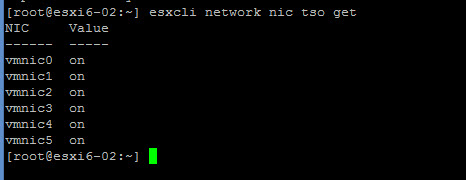
How to check If a physical network adapter supports TSO?
If yes, then TSO is enabled by default.
Via CLI – Run this command
to see if TSO is supported on the physical network adapter on a host:
esxcli network nic tso get
lab output:
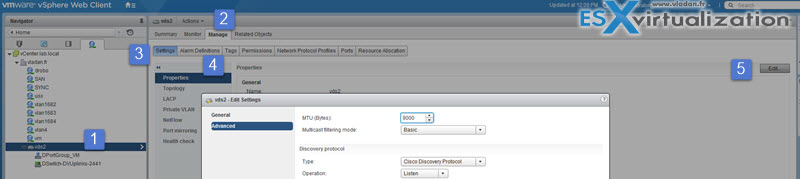
Enable Jumbo Frames support on appropriate components
Jumbo frames (MTU 9000) shall be enabled end-to-end if not they will ont raise the network performance, but the opposite will happens. By defaul the MTU is 1500. Jumbo Frames can be enabled on a vSwitch, vDS, and VMkernel Adapter.
Determine appropriate VLAN configuration for a vSphere implementation
You should check further the vSphere Networking guide (p.131)
VLAN configuration in a vSphere environment provides certain benefits.
- Integrates ESXi hosts into a pre-existing VLAN topology.
- Isolates and secures network traffic.
- Reduces congestion of network traffic
Tools
- vSphere Installation and Setup Guide
- vSphere Networking Guide
- Leveraging NIC Technology to Improve Network Performance in VMware vSphere
- vSphere Client / vSphere Web Client
No comments:
Post a Comment